A Vanishing…

Optical illusion portrait photography

Abstract Portrait on Railway Lines

This technique creates a surreal portrait and is great if your model is a little camera shy. My Preenager son has off days when it comes to modelling for me, this shoot was done a week later than scheduled as he threw a grump about having to walk to the location.

Equipment:

  • A camera (Canon EOS 60D) and Kit Lens (Canon IS 18-55mm).
  • A tripod.
  • A picture frame with the glass and back removed (you can tape a picture mount inside the frame if you like).

Set-up:

Location is key for this shoot, there needs to be a strong link between what appears outside of the frame and what is inside the frame after post processing. So alleyways, tree lined driveways/lanes and tunnels are all good options but use your imagination and see what you can come up with. I would suggest railway lines but it is illegal to be on rail tracks in most countries whether they are active or not and you’re also trespassing on private property. I’m lucky enough to live near a heritage steam railway and they have some preserved but unused tracks that are accessible to the public.

At your chosen location, set up your camera and tripod, set the camera to Aperture Priority Mode (Av Mode) and dial in f/11. Set the ISO to about 100-200 & try to keep the shutter speed above 1/60 seconds.

Now compose your shot, kit lenses are great to acquire the balance of working distance, focal length and tripod height to get a beautifully composed shot.

The Shoot:

Set the lens to manual focus as you will need to take 2 shots and they need to be consistent. With your model holding the picture frame in place; focus on the models hands (use liveview & zoom in to get pinsharp focusing) and take your first shot. Check it for composition and focusing. Make any setting adjustments if needed, refocus and shoot again until you’re happy with your image.

DO NOT TOUCH THE FOCUS RING once you happy with your image with the model. Do not alter any settings and get your model to come stand with you whilst you take a few shots of just the background.

Post Processing:

I used Adobe PS Elements 12 to post process to show you didn’t need Photoshop to edit this.

Open your chosen model shot & background shot into the same PSE document. (Copy and then paste the model image into the Background image). The model image will be Layer 1 and the background image will be the Background Layer.

Activate Layer 1, go to the Toolbar and select the Polygonal Lasso Tool. Zoom in on the frame, then place a lasso point in each inner corner of the picture frame and it will become a Selection when you click on the first point again.

Press Ctrl+Shift+I to invert the selection. Press D to make black the foreground colour in the Colour Palette on the Toolbar and click on Add Layer Mask in the Layers Palette. This will allow the background image to show in the picture frame.

Press Ctrl+Shift+N to add a New Blank Layer. Click and drag this layer to move it between Layer 1 and the Background Layer in the Layers Palette.

Select the Brush Tool from the Toolbox, set it to a  smallish sized soft edged brush and paint shadow lines along the inside edges of the frame to make it appear more 3 dimensional. In the Layers Palette, set the Opacity to somewhere between 15-30% to make the shadow look realistic.

Activate Layer 1 and press Ctrl+Alt+Shift+E to merge all layers into a new layer.

Now edit as you would a normal image before flattening the layers and saving the image.


So if you have any questions or queries, comments or tips to help others, don’t be afraid to leave a comment below or if you give this technique a try, tag me in your post so I can see how you did and give you a like and a share (Twitter @MadWomanAndDSLR – Instagram @madwomanwithacamera).

Love always – Mad Woman with a Camera x


Oh Christmas Tree…

night photography long exposure illuminated tree

Night Photography & Long Exposure of an illuminated oak tree

Equipment:

Canon EOS 60D, Tamron SP 10-24mm & tripod.

Exif Information:

Aperture f/8.0, ISO 100 & Shutter speed 20 seconds

Traffic Trails

Light trail photography at night

Light Trail Photography

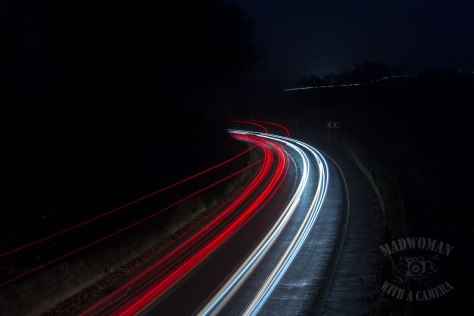
Traffic trails are usually the first experience many photographers have of night photography and long exposure. It’s a wonderful introduction into night photography as you really don’t need a lot of kit & most of the wizardry is done in camera so you don’t need much in the way of post processing either.

Equipment:

  • A camera (Canon EOS 60D) and a kit lens or a wide angle lens (Tamron SP 10-24mm).
  • A tripod.
  • A shutter release cable.
  • A flashlight (so you can see where your walking if there’s not much street lighting).
  • A reflective vest/jacket for personal safety at night.

Set-up:

You’ll need to find a location with a constant flow of traffic, a bridge over a dual carriageway or busy A-road is a good choice, as there will be plenty of cars and the elevated shooting position will be an advantage.

It’s best to arrive at your location and set up your camera whilst there’s still some light available so you can compose your shot. Remember to use the rule of thirds, strong lead in lines and a level horizon to produce a strong image.

Set your camera to Aperture Priority Mode (Av Mode) and dial in f/22 and set the ISO to 100. The Av mode will take care of the shutter speed which should be at around 30 seconds. Set the White Balance to Tungsten or Incandescent to counteract any sodium lighting and it helps to bring out the blue in the nights sky.

Focus using the Autofocus, aiming a third of the way into the image and this is why it’s important to arrive whilst its still light. Once focus is achieved, switch the lens to manual & be careful not to move it or knock the camera.

It’s best to shoot at twilight, just after the sun has gone below the horizon leaving some colour in the sky but it’s dark enough for the car lights to really stand out.

Most cameras have a little rubber viewfinder cover (I keep mine on the neck strap), use it to block off the viewfinder. Shooting near traffic with bright lights for an extended period time with long exposure times increases the risk of light leaking into the camera via the viewfinder and causing hazy streaks in the image. It’s just not worth the risk not to use it in my opinion.

The Shoot:

Take a test shot and check the image for exposure on the LCD screen. If the exposure is slightly off, use Exposure Compensation to adjust accordingly for your shot (positive compensation will lighten your shot and negative will darken it).

Once your happy, shoot away until you’ve taken lots of shots or your so cold, you can no longer feel your fingers (this is usually me).

Conclusion:

This is a fun shoot, whether beginner or expert, and I really love how easy it is to get a stunning image. For post processing I usually just use Adobe Lightroom for Lens Correction, Sharpening and occasionally a small crop just to tighten my composition.

Just remember to stay safe and if your not confident about being out at night on your own then take someone with you.

So if you have any questions or queries, comments or tips to help others, don’t be afraid to leave a comment below or if you give this technique a try, tag me in your post so I can see how you did and give you a like and a share (Twitter @MadWomanAndDSLR – Instagram @madwomanwithacamera).

Love always – Mad Woman with a Camera x
 

Further Resources:

https://cewe-photoworld.com/blog/photography-tips/capturing-light-trails


Blooper Shot:

Long-Exposure-Photography-Light-Trails-2

Dew Drop Macro Photography

dew drop on grass macro photography

Dew drop Macro Photography

Exif Data:

Canon EOS 60D & Tamron SP 60mm Macro

Aperture f/3.5, ISO 100 & Shutter speed 1/8secs

Low Level Landscape

landscape photography with a low point of view

Low Level Landscape Photography

Shooting very low to the ground gives a unique view of the world, making some very interesting images and helps to make any foreground interest really stand out. Its physically a little awkward & you”ll probably get a little dirty at best.

Equipment:

  • A camera (Canon EOS 60D) with a wide-angle lens (Tamron 10-24mm).
  • A mini tripod (Gorilla Pod), a tripod with a reversible central column or a camera cushion (this is a mini beanbag).
  • Cable release to remotely fire the shutter.

Set-up:

When you find a location where you’d like to try this technique, make sure you have some interesting foreground interest, such as a leaf, clump of moss, a stop tap cover, etc. Remember the location could be urban or rural, just make sure that you’re safe, I don’t want to read about a photographer in a fatality after lying in the middle of a busy road.

Set up your tripod or cushion, getting as low down as you can. Spend time fine tuning your composition & then lock off the tripod. Make sure your foreground interest is about 50cm in front of you. Using live-view on the LCD screen is the easiest method to shoot like this.

Set the camera to Aperture Priority Mode (AV), set the aperture to about f/22 to get as much sharpness as possible throughout the image and set ISO to 100. Attach the cable release to fire the shutter or you could set a 2sec self timer to avoid camera shake when you fire the shutter. Use the Auto Focus (AF) to focus on the foreground interest & once focus is achieved , switch the lens to manual.

The Shoot:

Once you’ve taken a couple of test shots, check the sharpness of the foreground interest by zooming in tight on the LCD screen and the overall composition (make sure the horizon is level). Make any adjustments you need & once your happy, the shoot away.

Since the foreground is so close and the background is so far away that it will be difficult to get everything pin sharp, even with a high f/stop but this is acceptable & adds to the interest of the image.

Post Processing Tips:

If you’re using a reversible column tripod, then your camera will have been attached upside down & may load onto your pc upside down too. This is easily corrected by rotating the image in your editing software. In PS elements use Image>Rotate>180. In Photoshop use Image>Image Rotation>180. You can easily rotate the image in Adobe bridge or Lightroom too.

Conclusion:

This was fun & I was dirty girl. It definitely adds a unique point of view to a landscape shoot, even if that landscape is a bit mundane.

Now go and have some fun getting low down and dirty!!!

So if you have any questions or queries, comments or tips to help others, don’t be afraid to leave a comment below or if you give this technique a try, tag me in your post so I can see how you did and give you a like and a share (Twitter @MadWomanAndDSLR – Instagram @madwomanwithacamera).

Love always – Mad Woman with a Camera x

Online Resources & Inspiration:

On The Road Again - Valley Of Fire - NV

20 Jaw-Dropping Examples Of Low Angle Photography

Beanbag DSLR Pod

Long Exposure of War Memorial

FOR THE FALLEN Poem by Robert Laurence Binyon (1869-1943), published in The Times newspaper on 21 September 1914. With proud thanksgiving, a mother for her children, England mourns for her dead across the sea. Flesh of her flesh they were, spirit of her spirit, Fallen in the cause of the free. Solemn the drums thrill: Death august […]

Fine Art Photography – Paper Play

This is a relatively simple technique but getting the paper prepared for the shoot can be a little time consuming and a little fiddly. Equipment & Props: Several Sheets of white A4 paper A sheet of A2 paper to use as a background A stapler or several small bulldog clips Camera (Canon EOS 60D) & […]

Faceless Boy – Halloween


Faceless boy at halloween in graveyard

Night Photography – Canon EOS 60D & Tamron SP 10-24mm

Exif details – f/11, ISO 6400, 1 sec shutter

Post Processing – Adobe Lightroom & PS Elements

Please leave a comment if you like the image or have a question. I’d very much appreciate it if you’d subscribe to my little blog or you can follow me on Social Media to see what else I’m doing.

Love always – Mad Woman with a Camera x


Strobing

Halloween Dancing Skeleton

A stroboscopic motion photography of a dancing skeleton for Halloween

This flashgun technique known as Stroboscopic Motion Photography helps to capture a sense of movement in an image. The principle is simple as all you need is a dark room or space with a dark background whilst using a long exposure, a series of flash fires illuminates your subject whilst moving to create a sequence of frozen positions in one image.

Equipment:

  • A DSLR & kit lens (I took a Canon EOS 60D & 18-55mm lens)
  • A flashgun (I used a Nissin Speedlite Di466)
  • A tripod
  • A good flashlight/torch

If your flashgun has a “stroboscopic”, “repeat” or “multi-flash” mode, then it’s capable of firing multiple times in one exposure, so read your user manual on how to set it up to do this. If your like me and just have a standard flashgun, then it needs to be set to manual and fired by quickly pressing the pilot or test button, I didn’t even mount mine on the camera, I used it hand held.

Location:

Finding a dark place shouldn’t be too difficult, you could use a garage (just block out any light) and rig up a dark background. Or go outside at night to somewhere with no lighting. Which is the option I went for, in fact as it was also our annual halloween shoot, myself, my husband and our son ended up in an old and disused section of a local church’s cemetery.

The Shoot:

I set up the camera on the tripod & set the camera to manual mode, I shot at ISO 100, aperture f/4, a shutter speed of 3.2secs and I used a 2 second timer delay on the shutter. A shutter speed that is slightly longer than the time it will take your subject to complete their movement is fine, as the flashed movements are all that will show in the final image.

Now I framed up my shot using the live view function on the LCD screen and used my torch to assist, which also helped the lens autofocus to lock on before changing the lens to manual to lock in the focus. Just ensure the subject doesn’t move closer or further away or you’ll have to refocus. I now set my flashgun to manual and set the power to 1/32. This won’t be a problem if your shooting indoors as you can just have the overhead light on for this, but turn them off now.

I took a test shot, my Canon emits an orange light indicating the delay timer is on so when it went off, my model knew to start moving and I started to repeatedly firing the flash like a mad thing aiming it directly at him. When the shutter closed, I checked the image on the LCD screen for sharpness & exposure.

If the image is too bright, move the flash further away or if it’s too dark then move the flash closer to the subject but you’ll have to recompose and refocus the shot. You can also control the brightness by adjusting the power setting on the flashgun (but the higher the power, the slower it will recycle) or by adjusting the aperture f-stop. Just try again until your happy with your shot. It took 4 attempts before I got one I actually liked.

Post Processing Tips:

Open your image in Photoshop or PS Elements and open a Levels adjustment layer for the image. In the dialogue box, I adjusted the white slider to 220 and the black slider to 10, this is to darken the shadows and lighten the highlights.

I also had a couple of “distractions” in the image (probably nocturnal insects attracted to the flash fire) so I used the Clone Stamp Tool, setting a soft edge brush at 100% opacity to remove them.

Conclusion:

I really liked this technique, I’m not a big user of flashguns but this was a fun shoot. My son loved the final image, apparently its “proper creepy” plus he got to show off his dance moves and his new hoodie.

So if you have any questions or queries, comments or tips to help others, don’t be afraid to leave a comment below or if you give this technique a try, tag me in your post so I can see how you did and give you a like and a share (Twitter @MadWomanAndDSLR – Instagram @madwomanwithacamera).

Love always – Mad Woman with a Camera x


FURTHER RESOURCES:

http://people.rit.edu/andpph/text-digital-stroboscopy.html

http://www.picturecorrect.com/tips/long-exposure-and-stroboscopic-flash-effect/

Artists: Harold Eugene Edgerton, Marcel Duchamp & Gjon Mili


BLOOPER SHOTS!!!

Dancing Halloween Skeleton

Bye Bye (well not entirely)

I haven’t had the energy, time or inclination to blog for a few years now, and the thought of my photography images sat on here unloved & untended was somewhat upsetting. I’ve not had an easy time over the last few years but today after several weeks of decisions, I’ve decided to remove all my […]